

Warmups
These prep activities help activate the sensory systems (touch and proprioception), and enhance visual motor and fine motor skills. Pick a few or pick all.
- Hand Pushes
- Have your child push their palms together as hard as they can with elbows out and forearms held out horizontally for 5 seconds. Repeat 3 times.
- Bear Hugs
- Have your child hug themselves with their arms crossing their body and their hands touching opposing shoulder blades. Hold for 3 seconds, release and repeat.
- Lazy 8s
- Have your child trace large lazy 8s (a figure 8 on its side, ∞) in the air so their hand crosses the middle of their body. Complete 5-8 times and then repeat on the other side.
- Have them track their hand with their eyes while keeping their head still.
- Have your child trace large lazy 8s (a figure 8 on its side, ∞) in the air so their hand crosses the middle of their body. Complete 5-8 times and then repeat on the other side.
- Wrist Circles
- Have your child rotate their wrists clockwise and counterclockwise 5 times.
- Spider Hand
- Have your child spread their fingers far apart on the table. Have them press their fingertips into the table as their palm lifts away from the table, making their hand into a “spider.” Repeat 3 times and then complete on other hand.
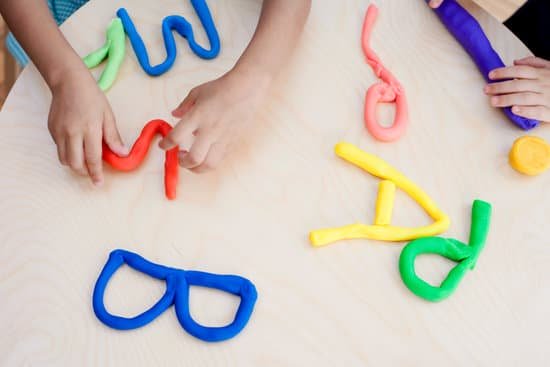
- Playing with Play-Doh (see Anything Goes with Play-Doh)
- Playing with small toys (the more intricate, the better)
- Examples: windup toys, squeeze toys, pegs, stackers, blocks, pop beads, Legos
- Using tongs or tweezers to pick up small objects
Practice
Now that our hands and senses are warmed up, we can get down to actual letters.
Letter Formation is putting together the elements of each letter. Incorporating sensory components can be helpful with this.
- Providing verbal cues or rhymes to write a letter
- Example: “Big B has a tall straight back and 2 big bellies because he just ate a snack.”
- Drawing letters in a variety of textures with their fingers
- Textures to try: sand, paint, shaving cream (If they don’t like certain textures, they can still do this with a Ziploc bag (see Less-Stress Mess)
- Writing letters on a variety of surfaces with a writing utensil
- Surfaces to try: sandpaper, Styrofoam, cardboard, Play-Doh
- Building letters
- Materials to try: Play-Doh, popsicle sticks, Wikki Stix, pipe cleaners
Spacing is making sure the letters and words are evenly and consistently spaced.
- Using graph paper to help with spacing between letters and words
- When writing a word, write a letter in each space.
- When the word is complete, leave 1 or 2 squares empty before writing the next word.
- After writing a word, have your child place their index finger of their non-writing hand to make a space. Start the next word to the right of their finger.
- You can use a popsicle stick to do this as well.
Sizing and Alignment makes sure the letters are in proportion and in straight lines.
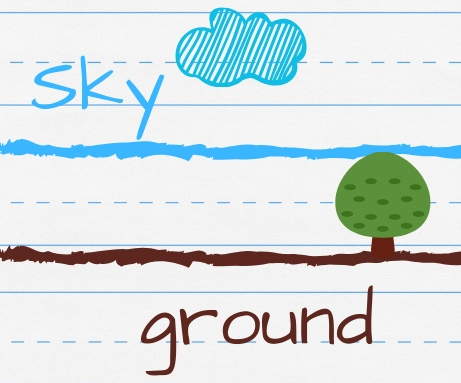
- Using lined paper, trace the bottom line with green or brown marker to represent the ground. Highlight the top line with a blue marker and say it’s the sky. To avoid “floating” letters, have the child to write letters where all letters must touch the “ground.” Tall letters must touch the “sky.”
- If you’re feeling artsy, draw flowers or trees that start from ground and grow to the sky. For short letters, you can draw bushes, birds, or worms and let them know that short letters do not go past these images.

- Highlight the margins of lined paper if your child starts writing in the middle of the paper.
- Green on the left side margin for “go”, red on the right side margin for “stop.”
- Graph paper can be helpful with sizing letters.
- Capital letters use 4 squares, tall letters and letters with tails use 2, short letters use 1.
Cool Down
Make sure your child knows that they are doing a great job. Have them tell you about what they are writing and feature it on the fridge or in their room. You can also have them keep their writing exercises in a special handwriting practice box or binder. They can keep their writing utensils in a special decorated pencil box as well.
The more they feel accomplished about handwriting, the more they will enjoy doing these exercises and writing daily.
Visit our Child(ish) Advice Pinterest Page for more handwriting activities from other fabulous OTs.
Sources:
“10 Ways to Teach Letter Formation”, The OT Toolbox.
“Handwriting Warm Up Exercises”, Teach Handwriting.
“Handwriting Warmup Exercises for Little Hands”, The OT Toolbox.
“How to Fix Poor Spacing in Handwriting”, Heather Greutman. Growing Hands-On Kids.
“Legible Handwriting”, Handwriting Help for Kids.

2 thoughts on “The Quick Long List of Handwriting Activities”